***Disclaimer: The following summary contains information gathered from various sources such as product descriptions, technical specifications and catalogs. While efforts have been made to provide accurate details, inaccuracies may occur. It is advised to verify all information by contacting Bosch Rexroth directly.***
The Bosch Rexroth A2FM56/61W-VAB010 (R902160718) is a high-performance axial piston motor designed for both open and closed circuit applications. This all-purpose high-pressure motor showcases a bent-axis design, ensuring efficient operation and durability even under demanding conditions. With its large variety of available nominal sizes, the A2FM56/61W-VAB010 can be precisely adjusted to suit specific application requirements, making it highly versatile for a range of uses.
The motor features an impressive nominal pressure capability of up to 400 bar and can handle a maximum pressure of up to 450 bar, indicative of its robustness and suitability for high-pressure tasks. Its power density is substantial, allowing it to deliver significant power relative to its size. Additionally, the total efficiency is very high, which contributes to better overall performance and energy conservation during operation.
An essential characteristic of the A2FM56/61W-VAB010 is its high starting efficiency. This feature ensures that the motor operates effectively from startup without requiring excessive power or time to reach operational status. For added versatility, the working ports are designed with SAE flange or thread options, providing flexibility in connection types.
For safety and functionality, this model optionally comes with an integrated pressure relief valve. It can also be equipped with additional mounted valves such as counterbalance valve BVDBVE or flushing and boost pressure valve, depending on the user's needs. These optional features enhance the motor's capability to manage various operational demands while maintaining stability and performance.
The metric version of this Bosch Rexroth motor is engineered to meet stringent quality standards and is suitable for a wide array of industrial applications where reliability and efficiency are paramount. Whether used in mobile equipment or industrial settings, the A2FM56/61W-VAB010 delivers consistent and reliable performance that users have come to expect from Bosch Rexroth products.
$5,335.00 USD
More are expected on February 2, 2027
Status: This product is temporarily out of stock.
Qty: Delivered as early as February 2, 2027 when ordered in
This product is eligible for factory repair.
Large variety of available nominal sizes allows exact adjustment to the application High power density Very high total efficiency High starting efficiency Working ports SAE flange or thread Optional with integrated pressure relief valve Optional with mounted addifitonal valve: counterbalance valve (BVD/BVE), flushing and boost-pressure valve Bent-axis design

| 1) | Tapered shaft with threaded pin and woodruff key (DIN 6888). The torque must be transmitted via the tapered press fit. |

| 1) | Threaded ports at the sides plugged with threaded plugs. |
| 2) | Please contact us. |
| 3) | Specify ordering code of counterbalance valve according to data sheet 95522 (BVD) respectively data sheet 95525 (BVE) separately. |
| 4) | Specify ordering code of sensor according to data sheet 95133 (DSA) respectively data sheet 95135 (HDD) separately. |
Table of values
|
Size |
5 | 10 | 12 | 16 | 23 | 28 | 32 | 107 | 125 | 160 | 180 | 200 | 250 | 355 | 500 | 710 | 1000 | |||
|
Displacement |
Vg |
cm³ |
4.93 | 10.3 | 12 | 16 | 22.9 | 28.1 | 32 | 106.7 | 125 | 160.4 | 180 | 200 | 250 | 355 | 500 | 710 | 1000 | |
|
Nominal pressure |
pnom |
bar |
315 | 400 | 400 | 400 | 400 | 400 | 400 | 400 | 400 | 400 | 400 | 400 | 350 | 350 | 350 | 350 | 350 | |
|
Maximum pressure |
pmax |
bar |
350 | 450 | 450 | 450 | 450 | 450 | 450 | 450 | 450 | 450 | 450 | 450 | 400 | 400 | 400 | 400 | 400 | |
|
Maximum speed |
nnom 1) |
rpm |
10000 | 8000 | 8000 | 8000 | 6300 | 6300 | 6300 | 4000 | 4000 | 3600 | 3600 | 2750 | 2700 | 2240 | 2000 | 1600 | 1800 | |
|
nmax 2) |
rpm |
11000 | 8800 | 8800 | 8800 | 6900 | 6900 | 6900 | 4400 | 4400 | 4000 | 4000 | 3000 | |||||||
|
Inlet flow 3) |
at nnom |
qV |
l/min |
49 | 82 | 96 | 128 | 144 | 177 | 202 | 427 | 500 | 577 | 648 | 550 | 675 | 795 | 1000 | 1136 | 1600 |
|
Torque 4) |
at pnom |
M |
Nm |
24.7 | 66 | 76 | 102 | 146 | 179 | 204 | 679 | 796 | 1021 | 1146 | 1273 | 1393 | 1978 | 2785 | 3955 | 5570 |
|
Rotary stiffness |
c |
kNm/rad |
0.63 | 0.92 | 1.25 | 1.59 | 2.56 | 2.93 | 3.12 | 11.2 | 11.9 | 17.4 | 18.2 | 57.3 | 73.1 | 96.1 | 144 | 270 | 324 | |
|
Moment of inertia for rotary group |
JTW |
kg·m² |
0.00006 | 0.0004 | 0.0004 | 0.0004 | 0.0012 | 0.0012 | 0.0012 | 0.0116 | 0.0116 | 0.022 | 0.022 | 0.0353 | 0.061 | 0.102 | 0.178 | 0.55 | 0.55 | |
|
Maximum angular acceleration |
ɑ |
rad/s² |
5000 | 5000 | 5000 | 5000 | 6500 | 6500 | 6500 | 4500 | 4500 | 3500 | 3500 | 11000 | 10000 | 8300 | 5500 | 4300 | 4500 | |
|
Case volume |
V |
l |
0.17 | 0.17 | 0.17 | 0.2 | 0.2 | 0.2 | 0.8 | 0.8 | 1.1 | 1.1 | 2.7 | 2.5 | 3.5 | 4.2 | 8 | 8 | ||
|
Weight (approx.) |
m |
kg |
2.5 | 5.4 | 5.4 | 5.4 | 9.5 | 9.5 | 9.5 | 32 | 32 | 45 | 45 | 66 | 73 | 110 | 155 | 325 | 336 | |
| 1) |
These values are valid at: - for the optimum viscosity range from vopt = 36 to 16 mm2/s - with hydraulic fluid based on mineral oils |
| 2) | Intermittent maximum speed: overspeed for unload and overhauling processest, t < 5 s and Δp < 150 bar |
| 3) | Restriction of input flow with counterbalance valve |
| 4) | Torque without radial force, with radial force see table "Permissible radial and axial forces of the drive shafts" |
Note
The values in the table are theoretical values, without consideration of efficiencies and tolerances. The values are rounded. Exceeding the maximum or falling below the minimum permissible values can lead to a loss of function, a reduction in operational service life or total destruction of the axial piston unit. Other permissible limit values, such as speed variation, reduced angular acceleration as a function of the frequency and the permissible angular acceleration at start (lower than the maximum angular acceleration) can be found in data sheet 90261.Speed range
No limit to minimum speed nmin. If uniformity of motion is required, speed nmin must not be less than 50 rpm.
|
Determining the operating characteristics |
||
|
Inlet flow |

|
[l/min] |
|
Rotational speed |

|
[rpm] |
|
Torque |

|
[Nm] |
|
Power |

|
[kW] |
|
Key |
|
|
Vg |
Displacement per revolution [cm3] |
|
Δp |
Differential pressure [bar] |
|
n |
Rotational speed [rpm] |
|
ηv |
Volumetric efficiency |
|
ηhm |
Hydraulic-mechanical efficiency |
|
ηt |
Total efficiency (ηt = ηv • ηhm) |
Hydraulic fluids
The axial piston unit is designed for operation with mineral oil HLP according to DIN 51524.
Application instructions and requirements for hydraulic fluids should be taken from the following data sheets before the start of project planning:
90220: Hydraulic fluids based on mineral oils and related hydrocarbons 90221: Environmentally acceptable hydraulic fluids 90222: Fire-resistant, water-free hydraulic fluids (HFDR, HFDU) 90223: Fire-resistan, water-containing hydraulic fluids (HFAE, HFAS, HFB, HFC) 90225: Restricted technical data for operation with fire-resistant hydraulic fluidsViscosity and temperature of hydraulic fluids
|
|
Viscosity |
Shaft |
Temperature1) |
Comment |
|
Cold start |
νmax ≤ 1600 mm²/s |
NBR2) |
ϑSt ≥ -40 °C |
t ≤ 3 min, without load (p ≤ 50 bar), n ≤ 1000 rpm, |
|
FKM |
ϑSt ≥ -25 °C |
|||
|
Warm-up phase |
ν = 400 … 1600 mm²/s |
|
t ≤ 15 min, p ≤ 0.7 • pnom and n ≤ 0.5 • nnom |
|
|
Continuous operation |
ν = 10 … 400 mm²/s3) |
NBR2) |
ϑ ≤ +78 °C |
measured at port T |
|
FKM |
ϑ ≤ +103 °C |
|||
|
νopt = 16 … 36 mm²/s |
range of optimum operating viscosity and efficiency |
|||
|
Short-term operation |
νmin = 7 … 10 mm²/s |
NBR2) |
ϑ ≤ +78 °C |
t ≤ 3 min, p ≤ 0.3 • pnom measured at port T |
|
FKM |
ϑ ≤ +103 °C |
| 1) | If the specified temperatures cannot be maintained due to extreme operating parameters, please contact us. |
| 2) | Special version, please contact us. |
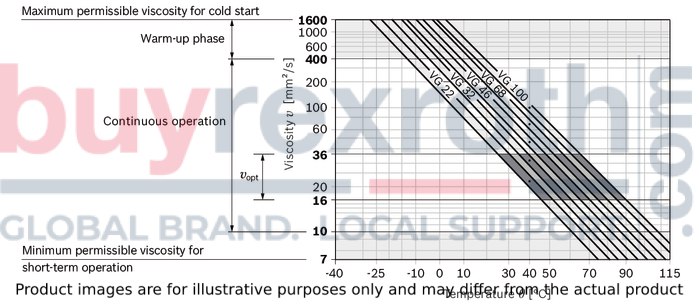
| 3) | Equates e.g. with the VG 46 a temperature range of +5 °C to +85 °C (see selection diagram) |
Note
To reduce high temperature of the hydraulic fluid in the axial piston unit we recommend the use of a flushing and boost pressure valve (see chapter Extended functions and versions).
Dependent on the unit size flushing the case at port U can be carried out alternatively.
Selection of hydraulic fluid
Bosch Rexroth evaluates hydraulic fluids on the basis of the Fluid Rating according to the technical data sheet 90235.
Hydraulic fluids with positive evaluation in the Fluid Rating are provided in the following technical data sheet:
90245: Bosch Rexroth Fluid Rating List for Rexroth hydraulic components (pumps and motors)The hydraulic fluid should be selected so that the operating viscosity in the operating temperature range is within the optimum range (νopt; see selection diagram).
Selection diagram
Filtration of the hydraulic fluid
Finer filtration improves the cleanliness level of the hydraulic fluid, which increases the service life of the axial piston unit.
A cleanliness level of at least 20/18/15 is to be maintained according to ISO 4406.
At a hydraulic fluid viscosity of less than 10 mm²/s (e.g. due to high temperatures in short-term operation) at the drain port, a cleanliness level of at least 19/17/14 according to ISO 4406 is required.
For example, the viscosity is 10 mm²/s at:
HLP 32 a temperature of 73°C HLP 46 a temperature of 85°COperating pressure range
|
Pressure at working port A or B (high-pressure side) |
Definition |
||
|
Nominal pressure |
pnom |
see table of values |
The nominal pressure corresponds to the maximum design pressure. |
|
Maximum pressure |
pmax |
see table of values |
The maximum pressure corresponds to the maximum operating pressure within the single operating period. The sum of the single operating periods must not exceed the total operating period. |
|
Single operating period |
10 s |
||
|
Total operating period |
300 h |
||
|
Minimum pressure |
pHP min |
25 bar |
Minimum pressure on high-pressure side (port A or B) required to prevent damage to the axial piston unit. |
|
Minimum pressure at inlet (pump operating mode) |
pE min |
see diagram |
To prevent damage to the axial piston motor in pump mode (change of high-pressure side with unchanged direction of rotation, e.g. when braking),a minimum pressure must be guaranteed at the working port (inlet). The minimum pressure depends on the rotational speed and displacement of the axial piston unit. |
|
Total pressure |
pSu |
700 bar |
The summation pressure is the sum of the pressures at both work ports (A and B). |
|
Rate of pressure change |
Definition |
||
|
with integrated pressure relief valve |
RA max |
9000 bar/s |
Maximum permissible rate of pressure build-up and reduction during a pressure change over the entire pressure range. |
|
without pressure relief valve |
RA max |
16000 bar/s |
|
|
Case pressure at port T |
Definition |
||
|
Continuous differential pressure |
ΔpT cont |
2 bar |
Maximum averaged differential pressure at the shaft seal (case to ambient) |
|
Pressure peaks |
pT peak |
10 bar |
t < 0.1 s |
Note
Working pressure range valid when using hydraulic fluids based on mineral oils. Values for other hydraulic fluids, please contact us.Minimum pressure at inlet (pump operating mode)
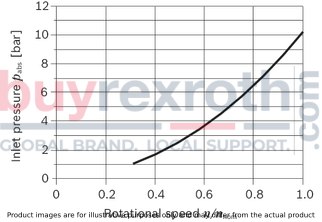
This diagram is only valid for the optimum viscosity range of vopt = 16 to 36 mm2/sec..
If the above mentioned conditions cannot be ensured, please contact us.
Pressure definition
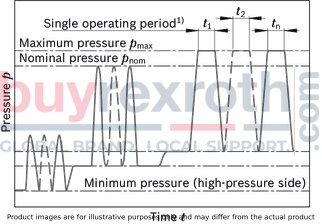
| 1) | Total operating period = t1 + t2 + ... + tn |
Rate of pressure change

Maximum differential pressure at the shaft seal, size 10 ... 200

Maximum differential pressure at the shaft seal, size 250 ... 1000

Note
The service life of the shaft seal is influenced by the speed of the axial piston unit and the case pressure. The service life decreases with an increase of the mean differential pressure between the case and the ambient pressure and with a higher frequency of pressure spikes. The case pressure must be equal to or higher than the ambient pressure.Direction of flow
|
Direction of rotation, viewed on drive shaft |
|
|
clockwise |
counter-clockwise |
|
A to B |
B to A |
Permissible radial and axial forces of the drive shaft
|
Size |
|||
|
Drive shaft |
Code |
||
|
⌀ |
|||
|
Maximum radial force |

|
Fq max |
|
|
a |
|||
|
Permitted torque at Fq max |
Tq max |
||
|
Permitted differential pressure at Fq max |
Δpq max |
||
|
Maximum axial force, when standstill or in non-pressurized conditions |

|
+ Fax max |
|
|
- Fax max |
|||
|
Maximum axial force, per bar operating pressure |
+ Fax max |
||
General instructions
The values given are maximum values and do not apply to continuous operation. The axial force in direction −Fax is to be avoided as the service life of the bearing is reduced. Special requirements apply in the case of belt drives. Please contact us.
Notes for sizes 250 ... 1000:
In case of radial forces limited performance data is valid. Please contact us. In case of axial forces during operation of the unit please contact us.Effect of radial force Fq on the service life of bearings
By selecting a suitable direction of radial force Fq the load on the bearings caused by the internal rotary group forces can be reduced, thus optimizing the service life of the bearings. Recommended position of mating gear is dependent on direction of rotation. Examples:
Toothed gear drive, size 5 … 180

Toothed gear drive, size 200 … 1000
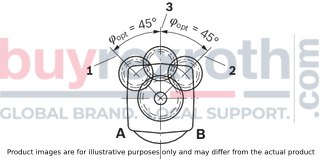
|
1 |
Direction of rotation "counter-clockwise", pressure at port B |
|
2 |
Direction of rotation "clockwise", pressure at port A |
|
3 |
Direction of rotation "bidirectional" |
Long-life bearing
Size 250 to 1000
For long life cycle and use with HF hydraulic fluids. Identical external dimensions as design with standard bearing. Subsequent modification to long-life bearing is possible. Bearing and housing flushing via connection U is recommended.
Bearing flushing
Flushing flow (recommended)
|
Size |
250 | 355 | 500 | 710 | 1000 | |
|
Flushing flow qv |
l/min |
10 | 16 | 16 | 16 | 16 |
Size 5
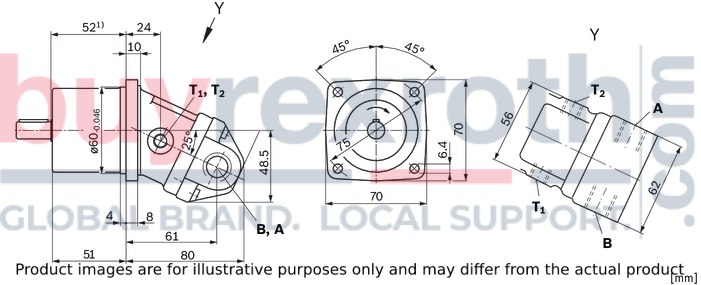
| 1) | To shaft collar |
Drive shafts

| 1) | Center bore according to DIN 332 (thread according to DIN 13) |
| 2) | Thread according to DIN 3852, maximum tightening torque: 30 Nm |
Ports
|
Size |
5 | ||
|
A, B |
Working port |
Size |
M18 × 1,5; 12 mm deep |
|
Standard 1) |
DIN 3852 | ||
|
State on delivery |
With protective cover (must be connected) | ||
|
T1 |
Drain port |
Size |
M10 × 1; 8 mm deep |
|
Standard 1) |
DIN 3852 | ||
|
State on delivery 2) |
Plugged (observe installation instructions) | ||
|
T2 |
Drain port |
Size |
M10 × 1; 8 mm deep |
|
Standard 1) |
DIN 3852 | ||
|
State on delivery 2) |
Plugged (observe installation instructions) | ||
| 1) | The spot face can be deeper than specified in the appropriate standard. |
| 2) | Unless otherwise specified. Other layouts on request. |
Size 10 … 16

| 1) | To shaft collar |
| 2) | Flange similar to ISO 3019-2 |
Drive shafts Z and A
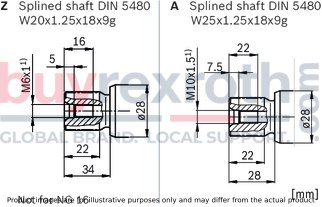
| 1) | Center bore according to DIN 332 (thread according to DIN 13) |
Drive shafts P and B
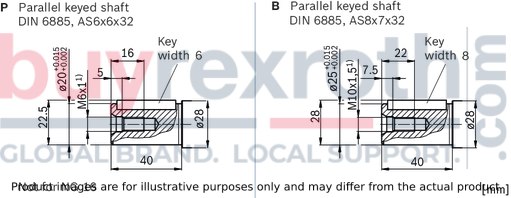
| 1) | Center bore according to DIN 332 (thread according to DIN 13) |
Port plate 03
Threaded ports at side, opposite

Port plate 04
Threaded ports at side and rear

Ports
|
Size |
10 | 12 | 16 | ||
|
A, B |
Working port |
Size |
M22 × 1,5; 14 mm deep | ||
|
Standard 1) |
DIN 3852 | ||||
|
State on delivery 2) |
With protective cover (must be connected) | ||||
|
T1 |
Drain port |
Size |
M12 × 1,5; 12 mm deep | ||
|
Standard 1) |
DIN 3852 | ||||
|
State on delivery 3) |
Plugged (observe installation instructions) | ||||
|
T2 |
Drain port |
Size |
M12 × 1,5; 12 mm deep | ||
|
Standard 1) |
DIN 3852 | ||||
|
State on delivery 3) |
With protective cover (observe installation instructions) | ||||
| 1) | The spot face can be deeper than specified in the appropriate standard. |
| 2) | Unless otherwise specified: In case of connection plate 04 ports at the sides plugged. Other layouts on request. |
| 3) | Unless otherwise specified. Other layouts on request. |
Size 23 … 180
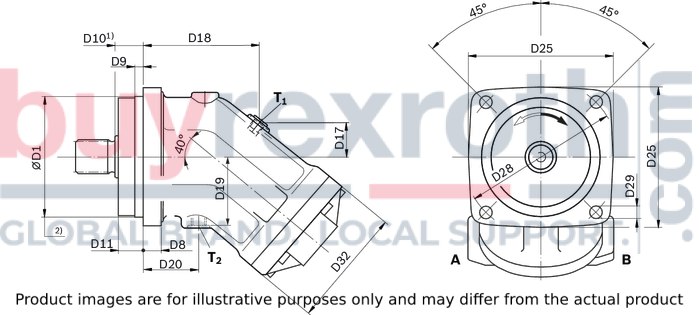
| 1) | To shaft collar |
| 2) | Flange ISO 3019-2 |
|
Size |
D1 |
D8 |
D9 |
D10 |
D11 |
D17 |
D18 |
D19 |
D20 |
D25 |
D28 |
D29 |
D32 |
|
|
mm |
mm |
mm |
mm |
mm |
mm |
mm |
mm |
mm |
mm |
mm |
mm |
mm |
mm |
|
| 23 | 100 |
0 - 0.022 |
18 | 8 | 25 | 23.2 | 25 | 106 | 56 | 42 | 118 | 125 | 11 | 106 |
| 28 | 100 |
0 - 0.022 |
18 | 8 | 25 | 23.2 | 25 | 106 | 56 | 42 | 118 | 125 | 11 | 106 |
| 32 | 100 |
0 - 0.022 |
18 | 8 | 25 | 23.2 | 25 | 106 | 56 | 42 | 118 | 125 | 11 | 106 |
| 107 | 160 |
0 - 0.025 |
23 | 10 | 40 | 23 | 40 | 140 | 85 | 65 | 190 | 200 | 17.5 | 150 |
| 125 | 160 |
0 - 0.025 |
23 | 10 | 40 | 23 | 40 | 140 | 85 | 65 | 190 | 200 | 17.5 | 150 |
| 160 | 180 |
0 - 0.025 |
25 | 10 | 40 | 37.2 | 47 | 158 | 96 | 72 | 210 | 224 | 17.5 | 180 |
| 180 | 180 |
0 - 0.025 |
25 | 10 | 40 | 37.2 | 47 | 158 | 96 | 72 | 210 | 224 | 17.5 | 180 |
Drive shafts Z and A

| 1) | Center bore according to DIN 332 (thread according to DIN 13) |
Splined shaft DIN 5480
|
NG |
Code |
Designation |
Thread G |
N2 |
N3 |
N4 |
N5 |
ØN6 |
|
mm |
mm |
mm |
mm |
mm |
||||
| 23 | Z | W25×1.25×18×9g | M8 × 1.25 | 6 | 19 | 28 | 43 | 35 |
| A | W30×2×14×9g | M10 × 1.5 | 7.5 | 22 | 27 | 35 | 35 | |
| 28 | Z | W25×1.25×18×9g | M8 × 1.25 | 6 | 19 | 28 | 43 | 35 |
| A | W30×2×14×9g | M10 × 1.5 | 7.5 | 22 | 27 | 35 | 35 | |
| 32 | A | W30×2×14×9g | M10 × 1.5 | 7.5 | 22 | 27 | 35 | 35 |
| 107 | Z | W40×2×18×9g | M12 × 1.75 | 9.5 | 28 | 37 | 45 | 50 |
| A | W45×2×21×9g | M16 × 2 | 12 | 36 | 42 | 50 | 50 | |
| 125 | A | W45×2×21×9g | M16 × 2 | 12 | 36 | 42 | 50 | 50 |
| 160 | Z | W45×2×21×9g | M16 × 2 | 12 | 36 | 42 | 50 | 60 |
| A | W50×2×24×9g | M16 × 2 | 12 | 36 | 44 | 55 | 60 | |
| 180 | A | W50×2×24×9g | M16 × 2 | 12 | 36 | 44 | 55 | 60 |
Drive shafts P and B
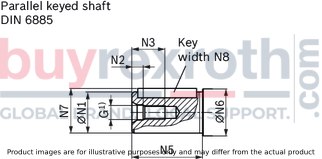
| 1) | Center bore according to DIN 332 (thread according to DIN 13) |
Parallel keyed shaft DIN 6885
|
NG |
Code |
Designation |
Thread G |
⌀N1 |
N2 |
N3 |
N5 |
⌀N6 |
N7 |
N8 |
|
|
mm |
mm |
mm |
mm |
mm |
mm |
mm |
mm |
||||
| 23 | P | ⌀25, AS8×7×40 | M8 × 1.25 | 25 |
+ 0.015 + 0.002 |
6 | 19 | 50 | 35 | 28 | 8 |
| B | ⌀30, AS8×7×40 | M10 × 1.5 | 30 |
+ 0.015 + 0.002 |
7.5 | 22 | 50 | 35 | 33 | 8 | |
| 28 | P | ⌀25, AS8×7×40 | M8 × 1.25 | 25 |
+ 0.015 + 0.002 |
6 | 19 | 50 | 35 | 28 | 8 |
| B | ⌀30, AS8×7×40 | M10 × 1.5 | 30 |
+ 0.015 + 0.002 |
7.5 | 22 | 50 | 35 | 33 | 8 | |
| 32 | B | ⌀30, AS8×7×40 | M10 × 1.5 | 30 |
+ 0.015 + 0.002 |
7.5 | 22 | 50 | 35 | 33 | 8 |
| 107 | P | ⌀40, AS12×8×63 | M12 × 1.75 | 40 |
+ 0.018 + 0.002 |
9.5 | 28 | 80 | 50 | 43 | 12 |
| B | ⌀45, AS14×9×63 | M16 × 2 | 45 |
+ 0.018 + 0.002 |
12 | 36 | 80 | 50 | 48.5 | 14 | |
| 125 | B | ⌀45, AS14×9×63 | M16 × 2 | 45 |
+ 0.018 + 0.002 |
12 | 36 | 80 | 50 | 48.5 | 14 |
| 160 | P | ⌀45, AS14×9×70 | M16 × 2 | 45 |
+ 0.018 + 0.002 |
12 | 36 | 90 | 60 | 48.5 | 14 |
| B | ⌀50, AS14×9×70 | M16 × 2 | 50 |
+ 0.018 + 0.002 |
12 | 36 | 90 | 60 | 53.5 | 14 | |
| 180 | B | ⌀50, AS14×9×70 | M16 × 2 | 50 |
+ 0.018 + 0.002 |
12 | 36 | 90 | 60 | 53.5 | 14 |
Port plate 01
SAE working ports at rear
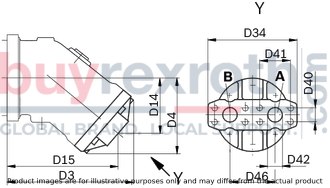
|
Size |
D3 |
D4 |
D14 |
D15 |
D34 |
D40 |
D41 |
D42 |
D46 |
|
mm |
mm |
mm |
mm |
mm |
mm |
mm |
mm |
mm |
|
| 23 … 32 | 173 | 106 | 78 | 153 | 115 | 18.2 | 40.5 | 13 | 59 |
| 107 … 125 | 252 | 159 | 120 | 225.5 | 194 | 31.8 | 66.7 | 32 | 99 |
| 160 … 180 | 294 | 188 | 134 | 252 | 194 | 31.8 | 66.7 | 32 | 99 |
Port plate 02
SAE working ports at side, opposite
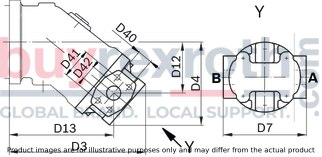
|
Size |
D3 |
D4 |
D7 |
D12 |
D13 |
D40 |
D41 |
D42 |
|
mm |
mm |
mm |
mm |
mm |
mm |
mm |
mm |
|
| 23 … 32 | 190 | 117 | 120 | 70 | 144 | 18.2 | 40.5 | 13 |
| 107 | 285 | 181 | 178 | 110 | 213 | 27.8 | 57.2 | 25 |
| 125 | 285 | 181 | 178 | 110 | 213 | 31.8 | 66.7 | 32 |
| 160 … 180 | 294 | 188 | 202 | 121 | 237 | 31.8 | 66.7 | 32 |
Port plate 03
Threaded ports at side, opposite
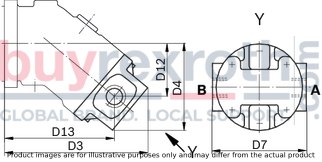
|
Size |
D3 |
D4 |
D7 |
D12 |
D13 |
|
mm |
mm |
mm |
mm |
mm |
|
| 23 … 32 | 190 | 117 | 120 | 70 | 144 |
Port plate 04
Threaded ports at side and rear
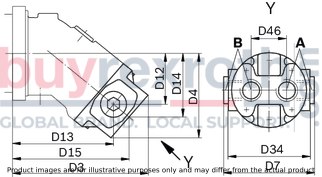
|
Size |
D3 |
D4 |
D7 |
D12 |
D13 |
D14 |
D15 |
D34 |
D46 |
|
mm |
mm |
mm |
mm |
mm |
mm |
mm |
mm |
mm |
|
| 23 … 32 | 190 | 117 | 130 | 70 | 144 | 88 | 166 | 120 | 58 |
Port plate 10
SAE working ports at bottom
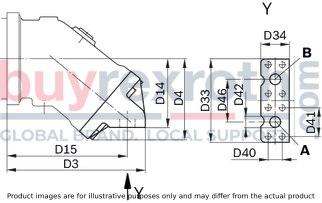
|
Size |
D3 |
D4 |
D14 |
D15 |
D33 |
D34 |
D40 |
D41 |
D42 |
D46 |
|
mm |
mm |
mm |
mm |
mm |
mm |
mm |
mm |
mm |
mm |
|
| 28 … 32 | 178 | 106 | 91 | 158 | 115 | 40 | 18.2 | 40.5 | 13 | 59 |
| 107 … 125 | 261 | 157 | 136 | 226 | 194 | 70 | 31.8 | 66.7 | 32 | 99 |
| 160 … 180 | 290 | 185 | 149 | 252 | 194 | 70 | 31.8 | 66.7 | 32 | 99 |
Note
The dimensional drawings of the port plates with valves can be found in the chapter "Extended functions and versions".Ports
|
Size |
23 | 28 | 32 | 107 | 125 | 160 | 180 | ||
|
A, B |
Working port |
Size |
1/2 in | 1 1/4 in 1) | 1 1/4 in | ||||
|
Standard |
Dimensions according to SAE J518 | ||||||||
|
Fastening thread 2) |
M8 × 1,25; 15 mm deep | M14 × 2; 19 mm deep 1) | M14 × 2; 19 mm deep | ||||||
|
State on delivery |
With protective cover (must be connected) | ||||||||
|
A, B |
Working port |
Size |
M27 × 2; 16 mm deep | ||||||
|
Standard 3) |
DIN 3852 | ||||||||
|
State on delivery 4) |
With protective cover (must be connected) | ||||||||
|
T1 |
Drain port |
Size |
M16 × 1,5; 12 mm deep | M18 × 1,5; 12 mm deep | M22 × 1,5; 14 mm deep | ||||
|
Standard 3) |
DIN 3852 | ||||||||
|
State on delivery 5) |
Plugged (observe installation instructions) | ||||||||
|
T2 |
Drain port |
Size |
M16 × 1,5; 12 mm deep | M18 × 1,5; 12 mm deep | M22 × 1,5; 14 mm deep | ||||
|
Standard 3) |
DIN 3852 | ||||||||
|
State on delivery 5) |
With protective cover (observe installation instructions) | ||||||||
| 1) | In case of port plate 02: Size of working port A, B: 1 in with fastening threads M12 × 1,75, 17 mm deep |
| 2) | Thread according to DIN 13 |
| 3) | The spot face can be deeper than specified in the appropriate standard. |
| 4) | Unless otherwise specified: In case of connection plate 04 ports at the sides plugged. Other layouts on request. |
| 5) | Unless otherwise specified. Other layouts on request. |
Size 200
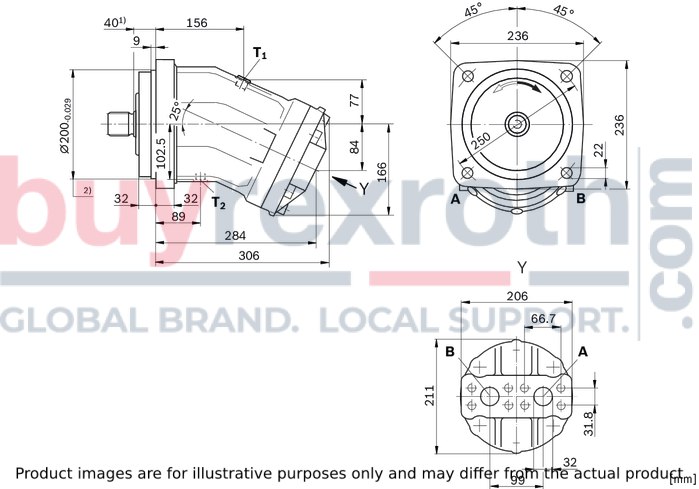
| 1) | To shaft collar |
| 2) | Flange ISO 3019-2 |
Drive shafts
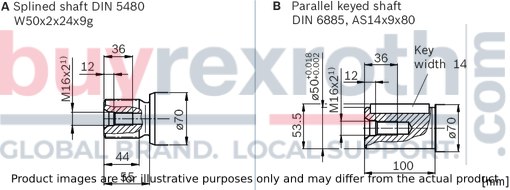
| 1) | Center bore according to DIN 332 (thread according to DIN 13) |
Ports
|
Size |
200 | ||
|
A, B |
Working port |
Size |
1 1/4 in |
|
Standard |
Dimensions according to SAE J518 | ||
|
Fastening thread 1) |
M14 × 2; 19 mm deep | ||
|
State on delivery |
With protective cover (must be connected) | ||
|
T1 |
Drain port |
Size |
M22 × 1,5; 14 mm deep |
|
Standard 2) |
DIN 3852 | ||
|
State on delivery 3) |
Plugged (observe installation instructions) | ||
|
T2 |
Drain port |
Size |
M22 × 1,5; 14 mm deep |
|
Standard 2) |
DIN 3852 | ||
|
State on delivery 3) |
With protective cover (observe installation instructions) | ||
| 1) | Thread according to DIN 13 |
| 2) | The spot face can be deeper than specified in the appropriate standard. |
| 3) | Unless otherwise specified. Other layouts on request. |
Size 250
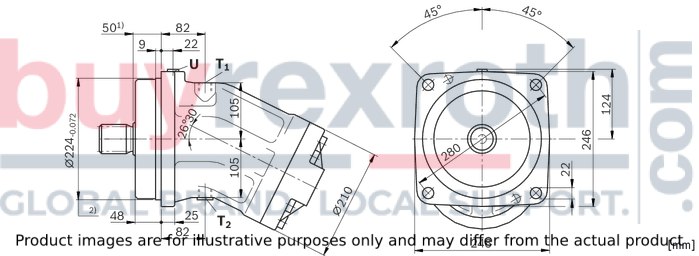
| 1) | To shaft collar |
| 2) | Flange ISO 3019-2 |
Drive shafts
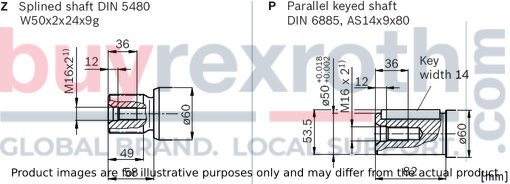
| 1) | Center bore according to DIN 332 (thread according to DIN 13) |
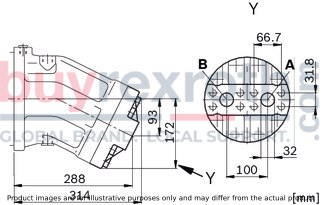
Port plate 01
SAE working ports at rear
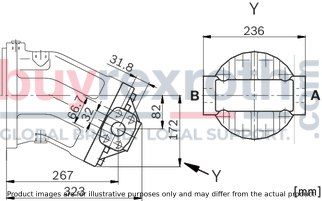
Port plate 02
SAE working ports at side, opposite
Ports
|
Size |
250 | ||
|
A, B |
Working port |
Size |
1 1/4 in |
|
Standard |
Dimensions according to SAE J518 | ||
|
Fastening thread 1) |
M14 × 2; 19 mm deep | ||
|
State on delivery |
With protective cover (must be connected) | ||
|
T1 |
Drain port |
Size |
M22 × 1,5; 14 mm deep |
|
Standard 2) |
DIN 3852 | ||
|
State on delivery 3) |
With protective cover (observe installation instructions) | ||
|
T2 |
Drain port |
Size |
M22 × 1,5; 14 mm deep |
|
Standard 2) |
DIN 3852 | ||
|
State on delivery 3) |
Plugged (observe installation instructions) | ||
|
U |
Bearing flushing |
Size |
M14 × 1,5; 12 mm deep |
|
Standard 2) |
DIN 3852 | ||
|
State on delivery |
Plugged | ||
| 1) | Thread according to DIN 13 |
| 2) | The spot face can be deeper than specified in the appropriate standard. |
| 3) | Unless otherwise specified. Other layouts on request. |
Size 355 … 1000
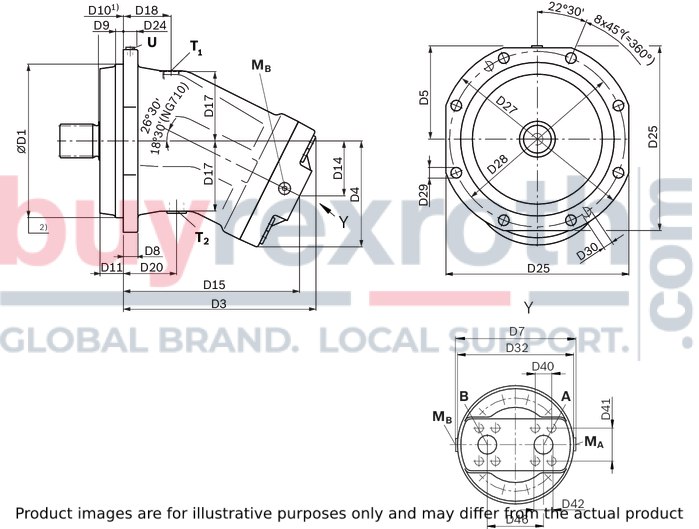
| 1) | To shaft collar |
| 2) | Flange ISO 3019-2 |
|
Size |
D1 |
D3 |
D4 |
D5 |
D7 |
D8 |
D9 |
D10 |
D11 |
D14 |
D15 |
D17 |
D18 |
D20 |
D24 |
D25 |
D27 |
D28 |
D29 |
D30 |
D32 |
D40 |
D41 |
D42 |
D46 |
|
|
mm |
mm |
mm |
mm |
mm |
mm |
mm |
mm |
mm |
mm |
mm |
mm |
mm |
mm |
mm |
mm |
mm |
mm |
mm |
mm |
mm |
mm |
mm |
mm |
mm |
||
| 355 | 280 |
0 - 0.081 |
350 | 198 | 171 | 250 | 28 | 14 | 50 | 48 | 102 | 320 | 128 | 83 | 83 | 23.5 | 335 | 360 | 320 | 18 | M18 | 245 | 36.6 | 79.4 | 40 | 120 |
| 500 | 315 |
0 - 0.081 |
396 | 220 | 192 | 276 | 30 | 14 | 50 | 48 | 112.5 | 362 | 142 | 98 | 111 | 27.5 | 375 | 400 | 360 | 22 | M20 | 270 | 36.6 | 79.4 | 40 | 130 |
| 710 | 400 |
0 - 0.089 |
507 | 249 | 236 | 344 | 35 | 14 | 50 | 47 | 102 | 485 | 183 | 131 | 156 | 41.5 | 465 | 500 | 450 | 22 | M24 | 340 | 44.5 | 96.8 | 50 | 170 |
| 1000 | 400 |
0 - 0.089 |
511 | 277 | 236 | 344 | 35 | 14 | 50 | 47 | 143 | 468 | 183 | 131 | 156 | 41.5 | 465 | 500 | 450 | 22 | M24 | 340 | 44.5 | 96.8 | 50 | 170 |
Drive shaft Z
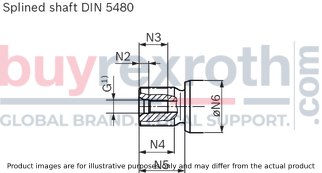
| 1) | Center bore according to DIN 332 (thread according to DIN 13) |
Splined shaft DIN 5480
|
NG |
Code |
Designation |
Thread G |
N2 |
N3 |
N4 |
N5 |
⌀N6 |
|
mm |
mm |
mm |
mm |
mm |
||||
| 355 | Z | W60×2×28×9g | M20 × 2.5 | 15 | 42 | 71 | 82 | 70 |
| 500 | Z | W70×3×22×9g | M20 × 2.5 | 15 | 42 | 67 | 80 | 80 |
| 710 | Z | W90×3×28×9g | M24 × 3 | 18 | 50 | 91 | 105 | 100 |
| 1000 | Z | W90×3×28×9g | M24 × 3 | 18 | 50 | 91 | 105 | 100 |
Drive shaft P

| 1) | Center bore according to DIN 332 (thread according to DIN 13) |
Parallel keyed shaft DIN 6885
|
NG |
Code |
Designation |
Thread G |
⌀N1 |
N2 |
N3 |
N5 |
⌀N6 |
N7 |
N8 |
|
|
mm |
mm |
mm |
mm |
mm |
mm |
mm |
mm |
||||
| 355 | P | ⌀60, AS18×11×100 | M20 × 2.5 | 60 |
+ 0.03 + 0.011 |
15 | 42 | 105 | 70 | 64 | 18 |
| 500 | P | ⌀70, AS20×12×100 | M20 × 2.5 | 70 |
+ 0.03 + 0.011 |
15 | 42 | 105 | 80 | 74.5 | 20 |
| 710 | P | ⌀90, AS25×14×125 | M24 × 3 | 90 |
+ 0.035 + 0.013 |
18 | 50 | 130 | 100 | 95 | 25 |
| 1000 | P | ⌀90, AS25×14×125 | M24 × 3 | 90 |
+ 0.035 + 0.013 |
18 | 50 | 130 | 100 | 95 | 25 |
Ports
|
Size |
355 | 500 | 710 | 1000 | ||
|
A, B |
Working port |
Size |
1 1/2 in | 2 in | ||
|
Standard |
Dimensions according to SAE J518 | |||||
|
Fastening thread 1) |
M16 × 2; 21 mm deep | M20 × 2,5; 30 mm deep | ||||
|
State on delivery |
With protective cover (must be connected) | |||||
|
T1 |
Drain port |
Size |
M33 × 2; 18 mm deep | M42 × 2; 20 mm deep | ||
|
Standard 2) |
DIN 3852 | |||||
|
State on delivery 3) |
With protective cover (observe installation instructions) | |||||
|
T2 |
Drain port |
Size |
M33 × 2; 18 mm deep | M42 × 2; 20 mm deep | ||
|
Standard 2) |
DIN 3852 | |||||
|
State on delivery 3) |
Plugged (observe installation instructions) | |||||
|
U |
Bearing flushing |
Size |
M14 × 1,5; 12 mm deep | M18 × 1,5; 12 mm deep | ||
|
Standard 2) |
DIN 3852 | |||||
|
State on delivery |
Plugged | |||||
|
MA, MB |
Measuring port pressure A, B |
Size |
M14 × 1,5; 12 mm deep | |||
|
Standard 2) |
DIN 3852 | |||||
|
State on delivery |
Plugged | |||||
| 1) | Thread according to DIN 13 |
| 2) | The spot face can be deeper than specified in the appropriate standard. |
| 3) | Unless otherwise specified. Other layouts on request. |
Flushing and boost pressure valve
The flushing and boost pressure valve is used in closed circuits for the removal of heat and to ensure a minimum boost pressure level.
Hydraulic fluid is directed from the respective low pressure side into the motor housing. This is then fed into the reservoir, together with the leakage. The removed hydraulic fluid must be replaced by cooled hydraulic fluid from the boost pump.
With port plate 027, the valve is mounted directly on the fixed motor (sizes 45 to 180, 250); with port plate 017 (sizes 355 and 500) on a plate.
Cracking pressure of pressure retaining valve
(observe when setting the primary valve)
Sizes 45 to 500, fixed setting: 16 bar
Switching pressure of flushing piston Δp
Sizes 45 to 500: 8±1 bar
Circuit diagram

Circuit diagram

Flushing flow qv
Orifices (throttles with integrated valve) can be used to set the flushing flows as required.
The specifications below are based on:
ΔpND = pND – pG = 25 bar and ν = 10 mm²/s
(pND = low pressure, pG = case pressure)
Flushing flow qv
Orifices (throttles with integrated valve) can be used to set the flushing flows as required.
The specifications below are based on:
ΔpND = pND – pG = 25 bar and ν = 10 mm²/s
(pND = low pressure, pG = case pressure)
With sizes 45 to 180, orifices can be supplied for flushing flows from 3.5 to 10 l/min. For flushing flows deviating from the values in the table, please state the required flushing flow when ordering. The flushing flow without orifice is approx. 12 to 14 l/min at low pressure ΔpND = 25 bar.
With sizes 45 to 180, orifices can be supplied for flushing flows from 3.5 to 10 l/min. For flushing flows deviating from the values in the table, please state the required flushing flow when ordering. The flushing flow without orifice is approx. 12 to 14 l/min at low pressure ΔpND = 25 bar.
Dimensions
Dimensions
Port plate 027
SAE working ports at side, opposite
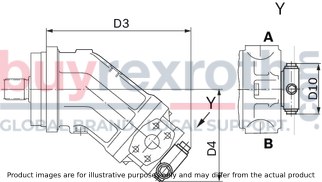
Port plate 027
SAE working ports at side, opposite

Port plate 017
SAE working ports at rear
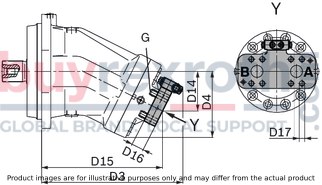
Port plate 017
SAE working ports at rear

Pressure relief valve
The MHDB pressure relief valves protect the hydraulic motor from overload. As soon as the set cracking pressure is reached, the hydraulic fluid flows from the high-pressure side to the low-pressure side.
The pressure relief valves are only available in conjunction with connection plates 181, 191 or 192. (Connection plate 181: see section “BVD and BVE counterbalance valve”
Setting range of cracking pressure: 50 up to 420 bar
For versions “with pressure sequencing stage” (code 192), a higher pressure setting can be implemented by connecting an external pilot pressure of 25 up to 30 bar at port pSt.
When ordering, state in plain text:
Cracking pressure of pressure relief valve Cracking pressure with pilot pressure applied to pSt (only with version 192)Pressure relief valve
The MHDB pressure relief valves protect the hydraulic motor from overload. As soon as the set cracking pressure is reached, the hydraulic fluid flows from the high-pressure side to the low-pressure side.
The pressure relief valves are only available in conjunction with connection plates 181, 191 or 192. (Connection plate 181: see section “BVD and BVE counterbalance valve”
Setting range of cracking pressure: 50 up to 420 bar
For versions “with pressure sequencing stage” (code 192), a higher pressure setting can be implemented by connecting an external pilot pressure of 25 up to 30 bar at port pSt.
When ordering, state in plain text:
Cracking pressure of pressure relief valve Cracking pressure with pilot pressure applied to pSt (only with version 192)Version without pressure boost facility (code 191)
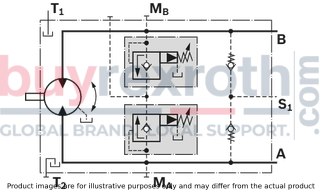
Version without pressure boost facility (code 191)

Version with pressure boost facility (code 192)
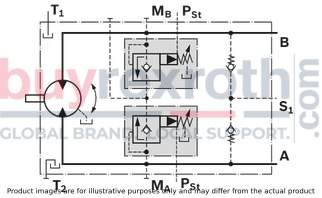
Version with pressure boost facility (code 192)

Dimensions
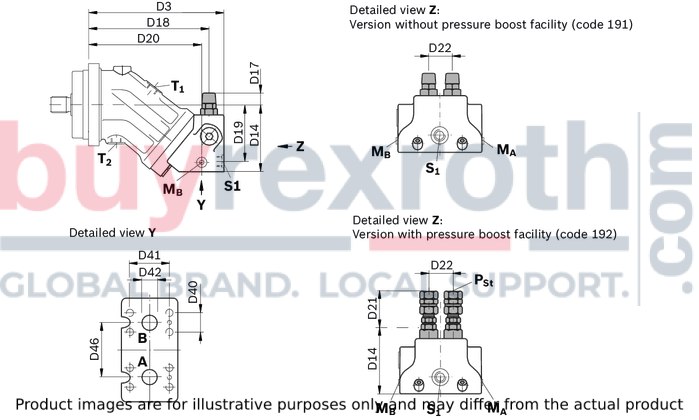
Dimensions

Counterbalance valve BVD and BVE
Function
Travel drive/winch counterbalance valves are designed to reduce the danger of overspeeding and cavitation of axial piston motors in open circuits. Cavitation occurs if the motor speed is greater than it should be for the given input flow while braking, travelling downhill, or lowering a load.
If the inlet pressure drops, the counterbalance spool throttles the return flow and brakes the motor until the inlet pressure returns to approx. 20 bar.
Note
BVD available for sizes 28 to 180 and BVE available for sizes 107 to 180. The counterbalance valve must be ordered additionally. We recommend ordering the counterbalance valve and the motor as a set. Ordering example: A2FM(E)90/61W–VAB188 + BVD20F27S/41B–V03K16D0400S12 The counterbalance valve does not replace the mechanical service brake and park brake. Observe the detailed notes on the BVD counterbalance valve in data sheet 95522 and BVE counterbalance valve in data sheet 95525! For the design of the brake release valve, we must know for the mechanical park brake: the pressure at the start of opening the volume of the counterbalance spool between minimum stroke (brake closed) and maximum stroke (brake released with 21 bar) the required closing time for a warm device (oil viscosity approx. 16 mm2/s)Travel drive counterbalance valve BVD...F
Application option:
Travel drive on wheeled excavatorsCounterbalance valve BVD and BVE
Function
Travel drive/winch counterbalance valves are designed to reduce the danger of overspeeding and cavitation of axial piston motors in open circuits. Cavitation occurs if the motor speed is greater than it should be for the given input flow while braking, travelling downhill, or lowering a load.
If the inlet pressure drops, the counterbalance spool throttles the return flow and brakes the motor until the inlet pressure returns to approx. 20 bar.
Note
BVD available for sizes 28 to 180 and BVE available for sizes 107 to 180. The counterbalance valve must be ordered additionally. We recommend ordering the counterbalance valve and the motor as a set. Ordering example: A2FM(E)90/61W–VAB188 + BVD20F27S/41B–V03K16D0400S12 The counterbalance valve does not replace the mechanical service brake and park brake. Observe the detailed notes on the BVD counterbalance valve in data sheet 95522 and BVE counterbalance valve in data sheet 95525! For the design of the brake release valve, we must know for the mechanical park brake: the pressure at the start of opening the volume of the counterbalance spool between minimum stroke (brake closed) and maximum stroke (brake released with 21 bar) the required closing time for a warm device (oil viscosity approx. 16 mm2/s)Travel drive counterbalance valve BVD...F
Application option:
Travel drive on wheeled excavatorsExample schematic for travel drive on wheeled excavators
A2FM(E)090/61W-VAB188 + BVD20F27S/41B–V03K16D0400S12
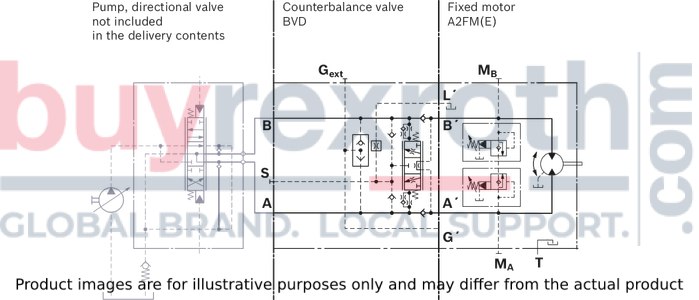
Example schematic for travel drive on wheeled excavators
A2FM(E)090/61W-VAB188 + BVD20F27S/41B–V03K16D0400S12

Winch counterbalance valve BVD...W and BVE
Application options:
Winch drive in cranes (BVD and BVE) Track drive in excavator crawlers (BVD)Winch counterbalance valve BVD...W and BVE
Application options:
Winch drive in cranes (BVD and BVE) Track drive in excavator crawlers (BVD)
Example schematic for winch drive in cranes
A2FM(E)090/61W-VAB188 + BVE25W385/51ND-V100K00D4599T30S00-0
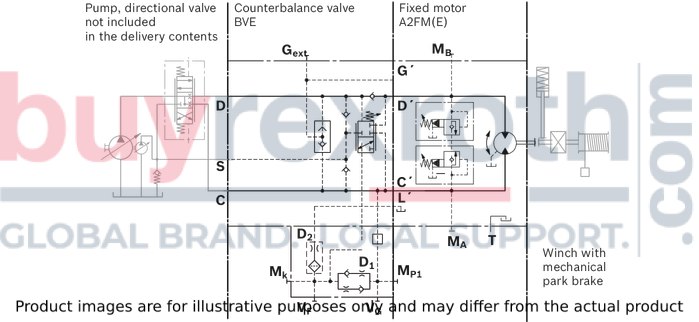
Example schematic for winch drive in cranes
A2FM(E)090/61W-VAB188 + BVE25W385/51ND-V100K00D4599T30S00-0

Dimensions
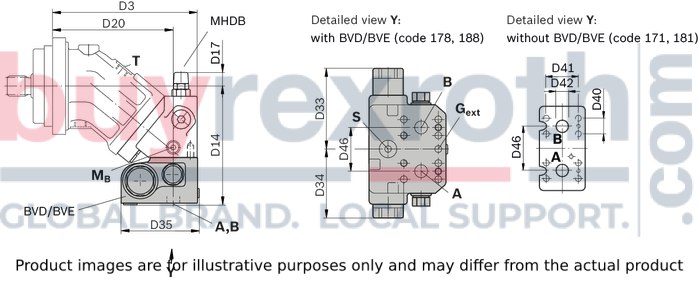
Dimensions

Speed sensors
The versions A2FM...U and A2FM...F ("prepared for speed sensor", i.e. without sensor) are equipped with a toothed ring on the rotary group.
On deliveries "prepared for speed sensor", the port is plugged with a pressure-resistant cover.
With the DSA or HDD speed sensor mounted a signal proportional to motor speed can be generated. The sensors measures the speed and direction of rotation.
Ordering code, technical data, dimensions and details on the connector, plus safety information about the sensor can be found in the relevant data sheet.
DSA: data sheet 95133
HDD: data sheet 95135
The sensor is mounted at the specially provided port as follows:
DSA: with one mounting bolt
HDD: with two mounting bolts
We recommend ordering the A2FM fixed motor complete with sensor mounted.
DSA speed sensor mounted (code V)
Size 23 … 200
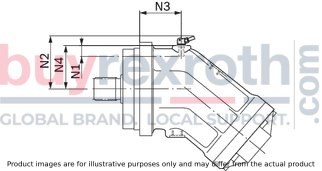
DSA speed sensor mounted (code V)
Size 23 … 200

HDD speed sensor mounted (code H)
Size 250 … 500

HDD speed sensor mounted (code H)
Size 250 … 500

Installation information
General information
During commissioning and during operation, the axial piston unit must be filled with hydraulic fluid and bled. This must also be observed during longer standstill as the axial piston unit might drain itself via the hydraulic lines. Complete filling and bleeding must especially be ensured with the “Drive shaft upwards” installation position as there is, for example, the risk of running dry. The leakage in the housing area must be discharged to the tank via the highest-located drain port (T1, T2). If one joint drain line is used for several units, it is to be ensured that the relevant housing pressure is not exceeded. The joint drain line must be dimensioned so that the maximum admissible housing pressure of all connected units is not exceeded in any operating state, particularly during cold start. If this is not possible, separate drain lines have to be laid, if necessary. In order to achieve favorable noise values, all connection lines are to be decoupled using elastic elements and over-tank installation is to be avoided. The tank line must lead into the tank below the minimum liquid level in every operating state.Installation position
See the following examples 1 to 8.
Further installation positions are possible upon request. Recommended installation position: 1 and 2.
Note
For installation position 4 and 8 "shaft upwards" an air bleed port R is required (specify in plain text when ordering, special version).
With sizes 250 to 1000, port U is provided as standard in the area near the bearings for air bleeding.
Below-tank installation (standard)
Below-tank installation is at hand if the axial piston unit is installed below the minimum liquid level outside the tank.

|
Installation position |
Air bleeding |
Filling |
|
1 |
‒ |
T1 |
|
2 |
‒ |
T2 |
|
3 |
‒ |
T1 |
|
4 |
R (U) |
T2 |
Above-reservoir installation
Above-reservoir installation means that the axial piston unit is installed above the minimum fluid level of the reservoir.
Recommendation for installation position 8 (drive shaft upward): A check valve in the drain line (cracking pressure 0,5 bar) can prevent draining of the pump housing.

|
Installation position |
Air bleeding |
Filling |
|
5 |
F |
T1 (F) |
|
6 |
F |
T2 (F) |
|
7 |
F |
T1 (F) |
|
8 |
R (U) |
T2 (F) |
|
Key |
|
|
F |
Filling / Air bleeding |
|
R |
Air bleed port |
|
U |
Bearing flushing / air bleed port |
|
T1, T2 |
Tank port |
|
ht min |
Minimum required immersion depth (200 mm) |
|
hmin |
Minimum required spacing to reservoir bottom (100 mm) |
| Note: Connection F is part of the external piping and must be provided on the customer side to simplify the filling and bleeding. |
General project planning notes
The axial piston unit is designed to be used in open and closed circuits. The project planning, installation and commissioning of the axial piston unit require the involvement of qualified skilled personnel. Before using the axial piston unit, please read the corresponding instruction manual completely and thoroughly. If necessary, request it from Bosch Rexroth. Before finalizing your design, request a binding installation drawing. The specified datas and notes must be observed. Preservation: Our axial piston units are supplied as standard with preservative protection for a maximum of 12 months. If longer preservative protection is required (maximum 24 months), please specify this in plain text when placing your order. The preservation times are valid under optimal storage conditions. Details of these conditions can be found in the data sheet 90312 or the instruction manual. Not all versions of the product are approved for use in a safety function according to ISO 13849. Please consult the responsible contact person at Bosch Rexroth if you require reliability parameters (e.g. MTTFD) for functional safety. A pressure relief valve is to be provided in the hydraulic system. Observe the instructions in the instruction manual regarding tightening torques of connection threads and other threaded joints used. The notes in the instruction manual on tightening torques of the port threads and other screw joints must be observed. The ports and fastening threads are designed for the permissible maximum pressure pmax (see instruction manual). The machine or system manufacturer must ensure that the connecting elements and lines correspond to the specified operating conditions (pressure, flow, hydraulic fluid, temperature) with the necessary safety factors. The working ports and function ports are designated only to accommodate hydraulic lines.Counterbalance valve
BVD 20-25
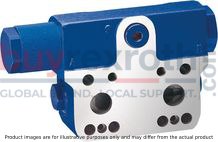
Counterbalance valve
BVD 20-25
Double acting for travel drives and winch drives Size 20 … 25 Nominal pressure 350 bar Maximum pressure 420 bar Direct attachment on Rexroth axial piston motors (A2FM / A2FE / A6VM / A6VE)Data sheet
Counterbalance valve
BVE 25
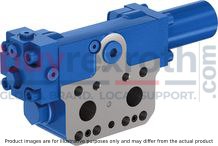
Counterbalance valve
BVE 25
Single acting for controlled load lowering in winch drives Size 25 Nominal pressure pump side 350 bar Nominal pressure motor side 420 bar Direct attachment on Rexroth axial piston motors (A2FM / A2FE / A6VM / A6VE)Data sheet
During and shortly after operation, there is a risk of burns on the axial piston unit. Take appropriate safety measures (e.g. by wearing protective clothing).
Related Products
R902193533
$4,710.00 USD
R909410194
$3,952.00 USD
R902197562
$5,335.00 USD
R902160543
$5,335.00 USD
R902186118
$5,699.00 USD


